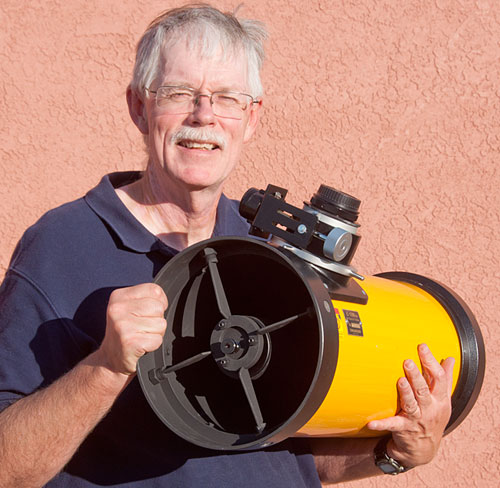
I purchased a used Takahashi Epsilon 180 ED Hyperbolic Astrograph from Astromart in January 2010. The Takahashi E-180 arrived in early February and I mounted it on the Casady Triad Bar next to the Astro-Physics 130mm Refractor atop the Astro-Physics 1200GTO German equatorial mount in Bifrost Observatory.
Initial tests showed that focusing was extremely critical. I was using a brand new SBIG ST-8300c CCD camera, but I was finding a focusing gradient across the field of view of this camera when mounted on the E-180. I attributed this to possible collimation problems. No manual came with the E-180 so I had to Google to find a scanned copy of it in PDF format. The text was in stilted/broken English and the collimating instructions were difficult to decipher. Nevertheless, I endeavored to collimate the primary while leaving the secondary alone. More imaging tests still showed the focusing gradient across the ST-8300c chip.
Was it the CCD camera or the E-180? I contacted neighbor Rick Beno about the issue and he agreed to let me try a test. We used Rick's E-180 to shoot an image of the open cluster M44 with each of our ST-8300c cameras. The image shot with Rick's camera was tack sharp across the field while my camera showed the ever persistent focus gradient. Conclusion: the CCD chip in my ST-8300c is not perpendicular to the optical axis of the camera housing. After some email exchanges with SBIG, I received authorization to return the ST-8300c for repair.
Two weeks later, I was back running focusing tests with the E-180 and ST-8300c. The focus gradient now appeared to be gone, but it was clear that the E-180 was still out of collimation. Star images away from the optical axis were enlarged and asymmetric. Time for another iteration on collimation. Then more imaging tests. The results were still disappointing, so I gave up for a while and concentrated on imaging with several Nikkor lenses on my Nikon D300.
Pat and I spent the summer and fall in Maryland and New Jersey. We returned to ASV in November but it was January 2011 before I was ready to tackle the E-180 collimation problem again. Since the collimation was totally unacceptable, I had nothing to lose by starting the entire collimation process from scratch.
I turned the collimation screws on both the primary and secondary mirrors so the mirrors were loose in their cells. Next, I slowly worked through Takahahi's cryptic instructions and tried to reason out each step. In a flash of inspiration I suddenly realized how to interpret the instructions and drawings. Here is a brief recap of my collimation procedure:
- Remove the corrector lens group from the telescope focuser. (This reduces the optical system to a simple Newtonian reflector.)
- Attach the 1.25" eyepiece holder to the focuser and insert the Takahashi collimating tube (tube with nylon cross hairs) and the Takahashi collimating eyepiece (metal disk with pinhole).
- Aim the telescope at an illuminated white screen several feet away.
- While sighting through collimating eyepiece, rotate secondary mirror until dot on it is centered on cross hairs. This may also require (slightly) moving the secondary mirror up and down the optical axis by adjusting the nuts on the secondary support bolt that holds it to the spider.
- Now tighten down the nuts on the secondary support bolt while maintaining the alignment of the secondary dot on the cross hairs.
- While sighting through the collimating eyepiece, adjust the three collimating screws on the secondary mirror cell until the dot on the primary mirror is centered on the cross hairs.
- While sighting through the collimating eyepiece, adjust the three collimating screws on the primary mirror cell until all reflections in the secondary mirror are centered on the cross hairs. The collimating screws on the primary use a push-pull system so it takes a little practice to make the mirror tip in the desired direction.
- Slowly tighten all collimating screws without changing the alignment.
- The telescope is now collimated. Remove the 1.25" eyepiece holder and insert the corrector lens group back into the telescope focuser.
After two hours of work, the mirrors looked like they were really collimated but the proof would come with some night sky imaging.
Success! I was finally seeing the super-flat field and tiny star images promised by this instrument. Visit the Messier Catalog Photo Gallery to see how the Tak E-180 performs.
| Takahashi Epsilon 180 ED Hyperbolic Astrograph Specifications | |
|---|---|
| Hyperbolic Primary: | 190mm (7.48") |
| Clear Aperture: | 180mm (7.09") |
| Secondary Mirror: | 80mm (3.15") |
| Central Obstruction: | 44% |
| Focal Length: | 500mm (19.7") |
| Focal Ratio: | f/2.8 |
| T/Stop: | f/3.1 |
| Resolution: | 0.64 arc seconds |
| Image Circle: | 44mm (60% not vignetted) |
| Corrector: | Extra-low dispersion two element corrector produces flat field images with no coma or chromatism |
| Focuser Type: | Low profile Crayford rack-and-pinion focuser; fully rotating for framing; provides 56mm of backfocus |
| Photographic Assembly: | M54mm female on the corrector (for wide T-mount) |
| Tube Dimensions: | Length = 570mm (22.4"); Diameter = 232mm (9.13") |
| Weight: | 23.6 lbs. (10.7 kg) |
